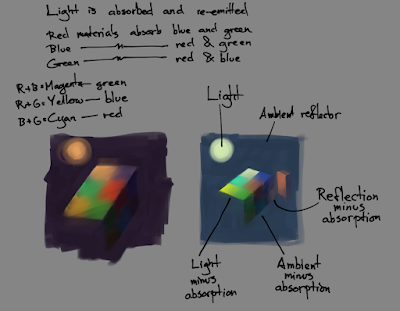
To determine the mix of light wavelengths reflected off an object to your eye, you need to consider the other objects that your object reflects and what the other objects reflect, and so on, until you reach a light source. Then you need to consider the angle between the object surface and the reflections and the texture of the object surface and the transparency and refraction of the object. Last, you need to consider what wavelengths the different objects absorb. Keywords: optics, anisotropy, diffuse reflection, specular reflection (speculum: mirror, specular: mirror-like), Snell's law, quantum electrodynamics, absorption of radiation, atmospheric attenuation.
Next, you go from a light outwards, on each reflection subtracting the absorbed wavelengths from the light color, until you reach your eye. For a scene with multiple lights, you repeat the procedure for each light and add up all the light that reaches the eye. The cone cells in the eye have a cone of light-sensitive pigments to detect light. To figure out the color as perceived by the cone cells, you need to take the pigment colors into account. There are usually three different kinds of pigments in the human eye: lots of green-sensitive, some red-sensitive, and few blue-sensitive. The sensitivity ranges for the greens and reds overlap quite a bit, as well. As a result, green appears bright, while blue appears dark. Keywords: ray tracing, photon tracing, retina, cone cells, color vision, perceived brightness.
At this point, you have a bunch of photoreceptors excited by the incoming light. But it's not the end of the story by any means. The photoreceptors are a part of a laterally inhibited neural network: an excited photoreceptor depresses the other photoreceptors around it. This acts as a natural sharpening filter, making the edges of lit areas appear brighter and the edges of shadow areas darker. There's also a system in place to fade out static images (probably to iron out imperfections in the eye?) The actual perceived color also depends on the overall color of the scene and the part of it inside the three degree field of sharp vision. And then you truck the information off for further processing (yeah, this is where my knowledge ends). Keywords: limulus eye, lateral inhibition, relative color, checkershadow illusion, Mach bands, stabilized retinal image, Troxler's fading.
In practice, it's relatively simple to apply the light reflection bit to painting: For lit objects, start off with the light color, subtract the absorption part of the object color (keeping diffuse and specular reflection in mind). For unlit objects, use the environmental reflection as the light. Add complexity as much as your head can handle. I tried it a bit earlier today, and it seems to be working alright.

No comments:
Post a Comment